Creating Chocolate Molds with 3D Printing and Vacuum Forming
June 08, 2023
Vacuum forming is quickly becoming a popular method for creating chocolate molds with fine detail, especially in combination with 3D printing. The process involves heating a sheet of food-grade plastic on a vacuum former until it is soft and pliable and then using a vacuum to pull the air out and suck the plastic onto a 3D printed shape. The thermoplastic form is then cooled and hardened, and the mold is released.
Once the mold is finished, it can be used to form chocolate pieces of various shapes and sizes and can be reused over and over again.
Vacuum forming is a great way to create custom chocolate molds for any occasion. With a little practice, you can design molds that are both intricate and impressively detailed.
Today we want to share a project from one of our customers who used his Ultimaker 3 Extended 3D printer in combination with the Mayku FormBox vacuum former to design unique and detailed chocolates of a historical building to share at a family reunion this summer.
Getting Started with 3D Printing and Vacuum Forming

3D Universe customer Herb Weiner got started with 3D printing in 2013. He had used his 3D printers for tools, repairs, and knick·knacks but felt it was high time to apply 3D printing to his favorite food: chocolate!
While there are now 3D printers that are specially made to work with chocolate, he didn't feel like this was the best approach for what he wanted to do. Chocolate 3D printers are primarily for decorative applications, such as creating desserts and cake decorations, and he felt that producing molds for chocolate bars would be a better solution.
Herb was really excited when he heard about the Mayku FormBox, a machine that uses vacuum forming to produce food-safe molds from 3D printed models, clay, cardboard, glass, and other objects. He wanted to create a high-quality custom chocolate bar with attractive packaging.
The Saturday evening Talent Show to be conducted at an upcoming family reunion, provided the perfect excuse for Herb to get started. He decided to produce custom chocolate bars shaped like an 1892 farmhouse, the site of the upcoming reunion.

“The house is on a 5.32-acre lot in Dayton, Oregon, and was built in 1892. My wife's parents purchased the house in September 1971, and their children (including my wife) went to school in Dayton. It was listed on the National Register of Historic Places in 1988,” he shared.
He used a recent photo taken by his wife, showing both the front and side of the house, but the addition on the right side was not part of the original house. Herb found a photo on the web showing the house at the time that it was nominated for the National Register of Historic Places, but that photo also included the addition.
Herb shared, “I wanted my model to reflect the appearance of the house prior to this addition but did not have any available photos to work from. My wife's family reunion was held on that site at the end of July.”
Creating the 3D Printed Design for Chocolates

In order to create the 3D printed design for his chocolates, Herb worked from some of the photographs of the old farmhouse that his wife had taken to create a design in Adobe Illustrator. He had to make some guesses about the original appearance of the house since he did not want to include the more recent additions.
The challenge was to include sufficient detail to ensure that the design would be recognizable but to avoid excessive detail that would be lost when casting a chocolate bar from a mold.
First, he created some software that allowed him to import the Adobe Illustrator artwork into OpenSCAD, the 3D parametric modeling software that he used to create the 3D model. OpenSCAD made it easy for him to change the depth and taper (draft angle) of the mold, the depth of the windows, the thickness of the lines, etc. In order to remove the chocolates from the mold, a slight taper is required – that is, the dimensions of the top must be slightly smaller than the dimensions of the base.

“Once I was satisfied with the OpenSCAD model, I exported this to STL. I imported the STL into Cura for slicing and 3D printed a set of four models on my Ultimaker 3 Extended printer.”
Herb ended up with a 3D model that measured about 2.25 inches x 2.75 inches.
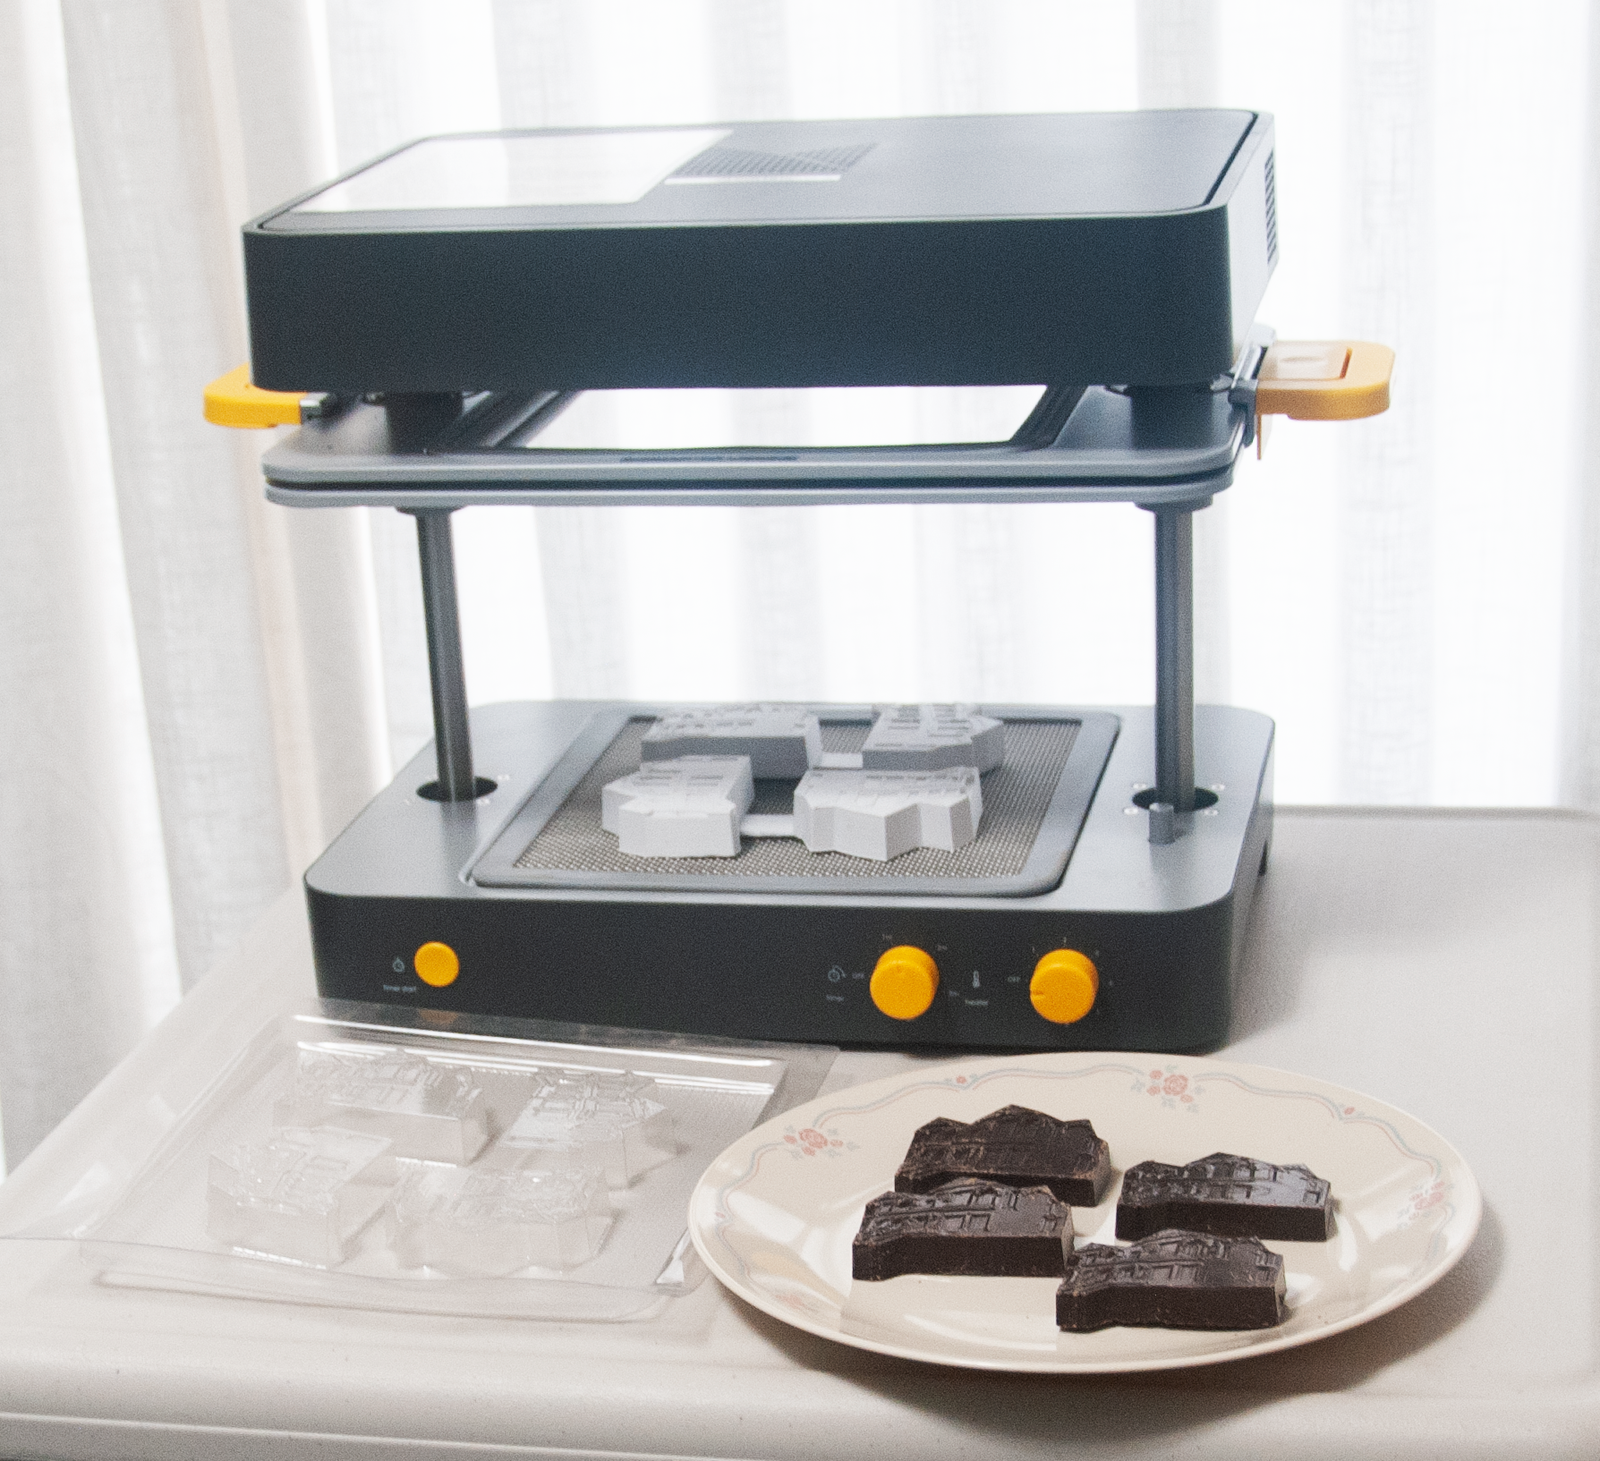
Creating Chocolate Molds with the Mayku FormBox

The food-safe Mayku Cast Sheets that Herb used to create his molds with the FormBox have a working area of about 8 inches square, so he was able to position four molds onto each Cast Sheet.
Since the molds created by the Mayku FormBox curve out slightly, he designed the molds to be deeper than necessary and then didn't completely fill the molds with chocolate.
Making the Chocolate for the Mold

After melting and properly tempering the chocolate, Herb used a melamine spoon to scoop the chocolate into the molds. (The chocolate would harden too quickly when using a metal spoon.) Some chocolate inevitably dripped outside of the molds, but it was easy to break off these drips once the chocolate hardened.
He found it most convenient to work with small batches of chocolate – enough to make about eight chocolates at a time.
Once the chocolates were cooled, he placed them into individually wrapped vacuum sealed plastic and shared them with family at the reunion, and of course, they were a welcome surprise!

Herb shares, “The chocolates show evidence of being hand-made: there are slight differences in the thickness of each chocolate, and minor imperfections such as small bubbles. These should be referred to the complaint department.”
Please make sure to visit Herb's original account of this experience on his website.
Learn More About the Mayku FormBox

For more information about the Mayku FormBox and how you can create custom chocolates, as well as prototypes, custom packaging, crafts, art projects for students, finished products, soaps, and even tasty treats for squirrels, please visit our website and check out some of our videos of our Creative Director Jen using the FormBox to make all kinds of things!
Written By Jen Owen
Related Articles

Benefits of Thermoforming in Business and Education
Nov 27, 2023
Introduction to Thermoforming Technology with the Mayku Multiplier Thermoforming, specifically pressure forming, is a transformative... More
Next-Level Production: Combining 3D Printing with Thermoforming
Oct 05, 2023
3D Printing and Thermoforming are both powerful technologies for digital fabrication. But the greatest benefits... More

Introducing the Mayku Multiplier Reducing Plate and Custom Mode!
Sep 26, 2023
The Mayku Multiplier is a desktop pressure former that can achieve sub-one-micron resolution in sheet... More

Comparison: Vacuum Forming vs Pressure Forming
Aug 22, 2023
How vacuum forming works Vacuum forming is the oldest method of thermoforming, and refers to... More

Laser Cut Halloween Decoration Ideas
Oct 17, 2022
It's that time of year again to share some of our favorite spooky, scary, creepy,... More

Benefits of Pairing a Vacuum Former with a 3D Printer
Sep 09, 2022
A 3D printer paired with a vacuum former can create objects with intricate shapes and... More
Search All Articles
Latest Posts From 3D Forming (Vacuum Forming & Pressure Forming)
All Blog Categories
-
3D Universe Untethered Video Podcast Series
-
Digital Fabrication in Education
-
Digital Fabrication Projects
-
Digital Fabrication Tutorials, Tips, and Tricks
-
Slicing Software
-
3D Printing Materials
-
Case Studies
-
Digital Fabrication Products
-
3D Forming (Vacuum Forming & Pressure Forming)
-
Laser Cutters
-
Digital Fabrication in the Workplace
-
3D Printed Prosthetics and Assistive Technology
-
3D Modeling (CAD)
-
Digital Fabrication in the News


